


In our previous article, we learned about the docker and creating the container image for microservices. Now, let’s explore Kubernetes guide to understand why and how to create Pod in Kubernetes for Microservices.
The diagram below provides a canonical example of co-locating multiple applications into a single fundamental entity scheduled onto a single machine. While one container is dedicated to serving web requests in this deployment, the second one synchronizes the filesystem with a remote Git repository.
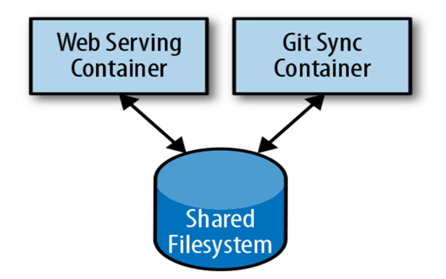
Putting a web server and a Git sync tool in one box might look easy, but they need different resources, especially the memory requirements differ. The web server must always answer user requests quickly, while the Git synchronizer works in the background with a “best effort” approach.
This method of using separate resources fits the elementary goal of containers, offering a robust way to make sure the web server works well.
As these two containers rely on each other, putting the web server on one machine and the Git tool on another doesn’t make sense. So, Kubernetes merges several containers into one unified unit called a “Pod.” This term is similar to the marine theme of Docker containers, where a group of whales is called a “Pod.”
Pods in Kubernetes (K8S)
A Pod is a group of application containers and volumes streaming in the same execution environment. The smallest deployable artifact in a Kubernetes cluster is the Pod, not the container. This means all the containers in a Pod always land on the same machine.
Containers within a Pod run together but share certain Linux namespaces. Applications coexisting within a single Pod exhibit the following characteristics:
- They utilize a common IP address and port range, sharing a network namespace.
- They share an integrated hostname established within the UTS namespace.
- They can link through inherent interprocess communication pathways, encompassing System V IPC or POSIX message queues facilitated by the IPC namespace.
However, applications in different Pods are kept separate; they have different IP addresses, hostnames, and more. Containers in different Pods running on the same node may also be on different servers.
Thinking with Pods
When venturing into Kubernetes adoption, a frequent inquiry arises: “What constitutes suitable content for a Pod?” Sometimes, combining a WordPress container and a MySQL database container within a single Pod seems appealing. This combination, however, is not a good example of an approach to constructing Pods. Two key factors contribute to this assertion:
- Lack of True Interdependence: WordPress and its associated database aren’t inherently dependent on being co-located. Even if these containers are on different machines, they work well together as they communicate with each other effectively over network connections.
- Dissimilar Scaling Requirements: WordPress and its database have different scaling dynamics. While WordPress is easy to use and flexible for frontend load adjustments by creating additional WordPress Pods, a MySQL database scaling needs more careful planning. The constraint of utilizing a unified scaling strategy for both containers within the same Pod proves impractical.
The Pod Manifest
Pods are described in a Pod manifest – a text-file representation of the Kubernetes API object. Kubernetes strongly believes in declarative configuration, which means that you write down the desired state of the world in a Kubernetes Pod configuration and then submit that configuration to a service that takes actions to ensure the desired state becomes the actual state. This approach is a central part of any Kubernetes guide, specifically when working with microservices in Kubernetes.
- The Kubernetes API server accepts and processes Pod manifests before storing them in persistent storage (etcd).
- The scheduler also uses the Kubernetes API to find Pods that haven’t been scheduled to a node.
- It then places the Pods onto nodes depending on the resources and other constraints expressed in the Pod manifests.
- The scheduler can place several Pods on one machine, as long as there are enough resources. However, placing multiple copies of an application on the same machine could make it a single point of failure, reducing reliability. As a result, the Kubernetes scheduler aims to spread application Pods across different machines to enhance reliability and reduce the effects of potential failures.
- Once scheduled to a node, Pods don’t move and must be explicitly destroyed and rescheduled.
You can deploy multiple instances of a Pod repeating the workflow described here. However, ReplicaSets are better suited for running multiple instances of a Pod.
Creating a Pod
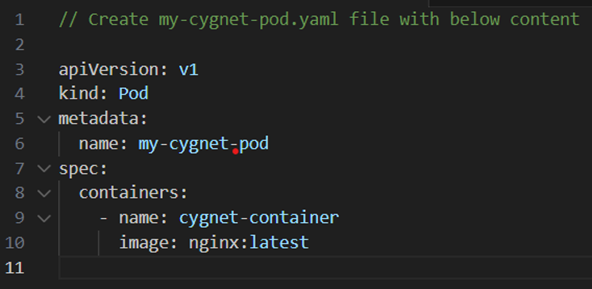
The simplest way to create a Pod is via the imperative kubectl apply command. For example, to run the my-cygnet-pod server, use the below code and create a file named “my-cygnet-pod”.
After creating the above file, run the kubectl apply command to create and run the pod.
$ kubectl apply -f my-cygnet-pod.yaml

You can see the status of this Pod by running the following:
$ kubectl get pods

Initially, you might observe the container in a Pending state, but later it will change to Running, indicating successful creation of the Pod and its containers.
For now, you can delete this Pod by running the following:
$ kubectl delete pods/my-cygnet-pod

Creating a Pod Manifest
You can write a Pod manifest using YAML or JSON, but YAML is generally preferred because it is slightly more human-editable and can add comments. It is essential to treat Pod manifests (along with other Kubernetes API objects) similar to source code, where comments play a role in explaining the Pod to new team members.
Pod manifests consist of various important fields and attributes. This includes a metadata section that defines the Pod and its labels, a specification section that details volumes, and a list of containers assigned to run within the Pod. Let’s deploy my-cygnet-pod using the following Docker command:
$ kubectl apply -f my-cygnet-pod.yaml
You can achieve a similar result by instead writing the below example to a file named my-cygnet-pod.yaml and then using kubectl commands to load that manifest to Kubernetes.
apiVersion: v1
kind: Pod
metadata:
         name: my-cygnet-pod
spec: containers:
         - image: nginx:latest
         name: my-cygnet-pod
         ports:
              - containerPort: 8080
              name: http
              protocol: TCP
While it might appear initially more intricate to oversee your application through this approach, maintaining a documented representation of the intended state proves to be the optimal strategy in the long term. This holds particularly true for sizable teams managing a multitude of applications.
Running Pods
We have created a Pod manifest that can be used to start a Pod running my-cygnet-pod. Now, we can use the kubectl apply command to launch a single instance of my-cygnet-pod:
$ kubectl apply -f my-cygnet-pod.yaml
The Kubernetes API server will receive and process the Pod manifest. Subsequently, the Kubernetes system will orchestrate the scheduling of the Pod onto a healthy node within the cluster, where the kubelet daemon will conduct continuous monitoring.
Listing Pods
We can list all Pods running in the cluster using the kubectl command-line tool. Here, this is the single Pod that we created in the previous step:
$ kubectl get pods

You can observe the Pod’s designated name (my-cygnet-pod), as assigned in the preceding YAML file. Aside from the count of operational containers (1/1), the output provides insights into the Pod’s current state, the frequency of its restarts and its lifespan.
Running this command promptly after the Pod’s creation could reveal further detail:
| NAME | READY | STATUS | RESTARTS | AGE |
| My-cygnet-pod | 0/1 | Pending | 0 | 1s |
The Pending state implies that the Pod has been submitted but not scheduled yet.
When a more significant error occurs, such as trying to create a Pod with a container image that doesn’t exist, it is also listed in the status field.
Pod Details
Sometimes, the single-line view is insufficient because it is too terse. Additionally, Kubernetes maintains numerous events about Pods in the event stream, not attached to the Pod object.
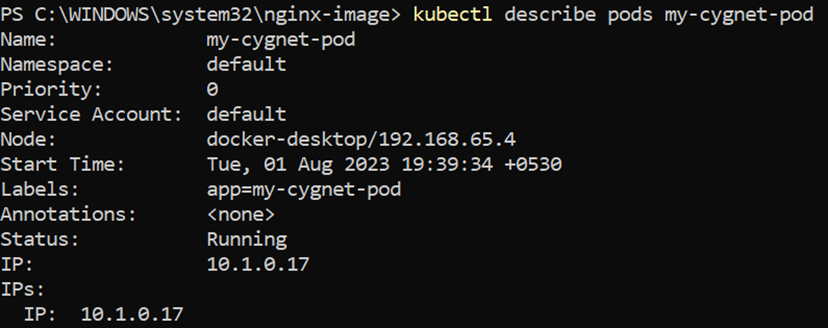
To learn more about a Pod (or any Kubernetes object), you can use the kubectl describe command. For example, to describe the Pod we previously created, you can run the following:
$ kubectl describe pods my-cygnet-pod
This command generates a plethora of details concerning the Pod, organized into various sections.
At the top, fundamental information regarding the Pod is shown.
Then, there is information about the containers running in the Pod:
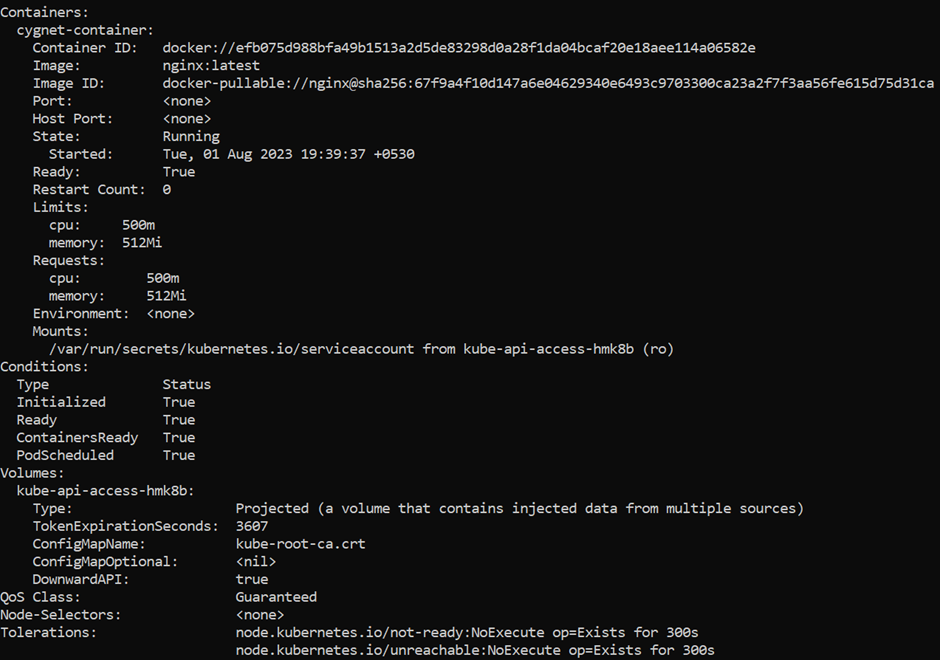
Finally, the events related to the Pod are listed. This includes information such as when the event was scheduled, when its image was pulled, and if/when it had to be restarted due to failing health checks.

Deleting a Pod
When deleting a Pod, you can delete it either by name:
$ kubectl delete pods/my-cygnet-pod

Or you can delete it using the same file that you used to create it:
$ kubectl delete -f my-cygnet-pod.yaml

When a Pod is deleted, it is not abruptly terminated abruptly. Instead, upon executing the command kubectl get pods, you’ll observe the Pod in a Terminating state.
Each Pod is allocated a termination grace period, typically set to 30 seconds by default. As a Pod transitions to the Terminating state, it ceases to accept new requests. This grace period serves a vital role by allowing the Pod to conclude ongoing requests and finalize processing before being shut down. This mechanism contributes significantly to enhancing reliability.
Accessing Pod
You may want to load the web service running in the Pod, view its logs, debug any problem, or even execute other commands inside it to help debug. Let’s learn how you can interact with the code and data inside your Pod.
Using Port Forwarding
While load balancers can make services accessible to the public or other containers, there are instances where you require direct access to a particular Pod, regardless of its internet traffic-serving status. This can be achieved through Kubernetes’ built-in port-forwarding feature, accessible via its API and command-line tools.
When you initiate the command:
$ kubectl port-forward my-cygnet-pod 8080:8080

A secure tunnel is established, extending from your local machine through the Kubernetes master and connecting to the active instance of the Pod on one of the worker nodes.
If the port-forward command is still running, you can access the Pod (the my-cygnet-pod web interface) at http://localhost:8080.
Getting More Info with Logs
You can dig deeper than describe to understand what the application is doing to debug it using Kubernetes commands for debugging running containers.
$kubectl debug <pod-name> -it –image=<debugging-tool-image>
Using the kubectl logs command, you can download the current logs from the running instance.
$ kubectl logs my-cygnet-pod
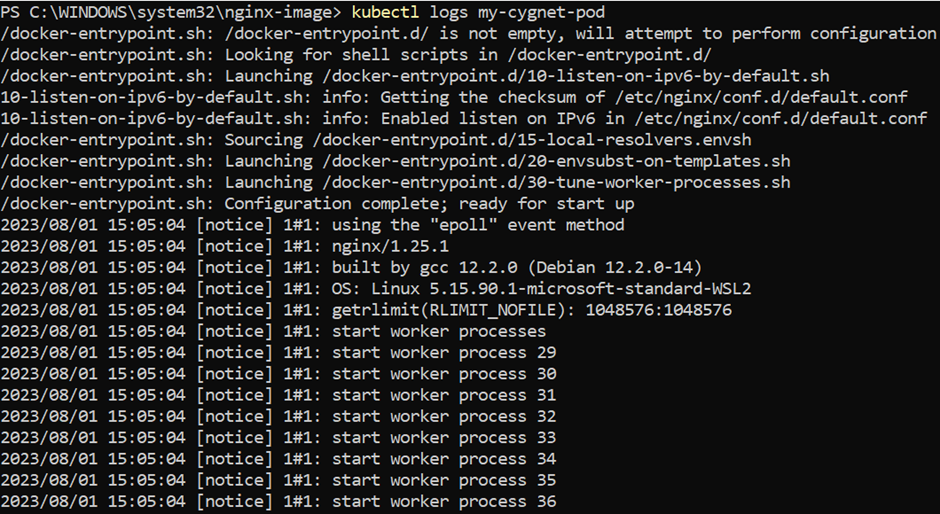
Adding the -f flag will cause you to stream logs continuously. The kubectl logs command attempts to fetch logs from the currently running container. Adding the –previous flag will get logs from a previous container instance. This is useful in cases where your containers are continuously restarting because of a problem at container startup.
Running Commands in Your Container with exec
Occasionally, logs might not provide adequate information, necessitating the execution of commands within the container’s environment to comprehend the situation. To achieve this, you can employ the following command:
$ kubectl exec my-cygnet-pod date or kubectl exec my-cygnet-pod – date

You just mastered the creation of Pods in Kubernetes for Microservices!
Conclusion
While microservices architecture helps you deploy features that prevent cascading failures, creating additional pods with Kubernetes deployments ensures no downtime, as containerized microservices in Kubernetes can be automatically managed and scaled.
To avail the additional benefits of deploying Kubernetes with microservices and creating pods for enhanced efficiency, contact our experts at Cygnet and learn more about the transformational outcomes your application can achieve with Kubernetes microservices architecture.